Changing your brakes might seem like a daunting task, but with the right know-how, you can save time and money.
Whether you’re a DIY enthusiast or just curious about the process, understanding how long it takes to change brakes can help you plan your day.
For most vehicles, a full brake job typically takes between 30 minutes to 2 hours per axle.
Quick Tips:
If you’re just starting out…
- Make sure you have the tools to do the job entirely.
- Do one wheel at a time, so you can reference the other side if you have problems.
- Some vehicles use different pads for each side of the rotor, so lay the pads out and match them to the new ones.
- Brake grease is a must. Pay the $1.99 for the little pouch
OK, Back to the Article…
This timeframe can vary depending on factors like your experience level, the condition of your current brakes, and the type of vehicle you’re working on.
Some luxury cars might require special tools, which could extend the process.
Remember, rushing through a brake job is never a good idea. Taking your time ensures safety and proper installation.
If you’re new to this, it’s better to set aside a whole afternoon. That way, you can work at a comfortable pace and triple-check your work without feeling pressured.
Key Takeaways
- Brake replacement time varies based on experience and vehicle type
- Proper tools and preparation can significantly reduce brake change duration
- Safety should be prioritized over speed when changing brake components
Understanding the Brake System Components
Your brake system is like a well-orchestrated symphony, with each part playing a crucial role.
Let’s peek under the hood and see how these components work together to keep you from becoming a hood ornament on the car in front of you.
The Role of Brake Pads and Rotors
Picture your brake pads as the unsung heroes of your car’s stopping power.
These little guys are the friction kings, pressing against the rotors to slow you down.
Brake pads come in different flavors – organic, semi-metallic, and ceramic. Each has its own personality, kind of like choosing between mild, medium, or spicy salsa.
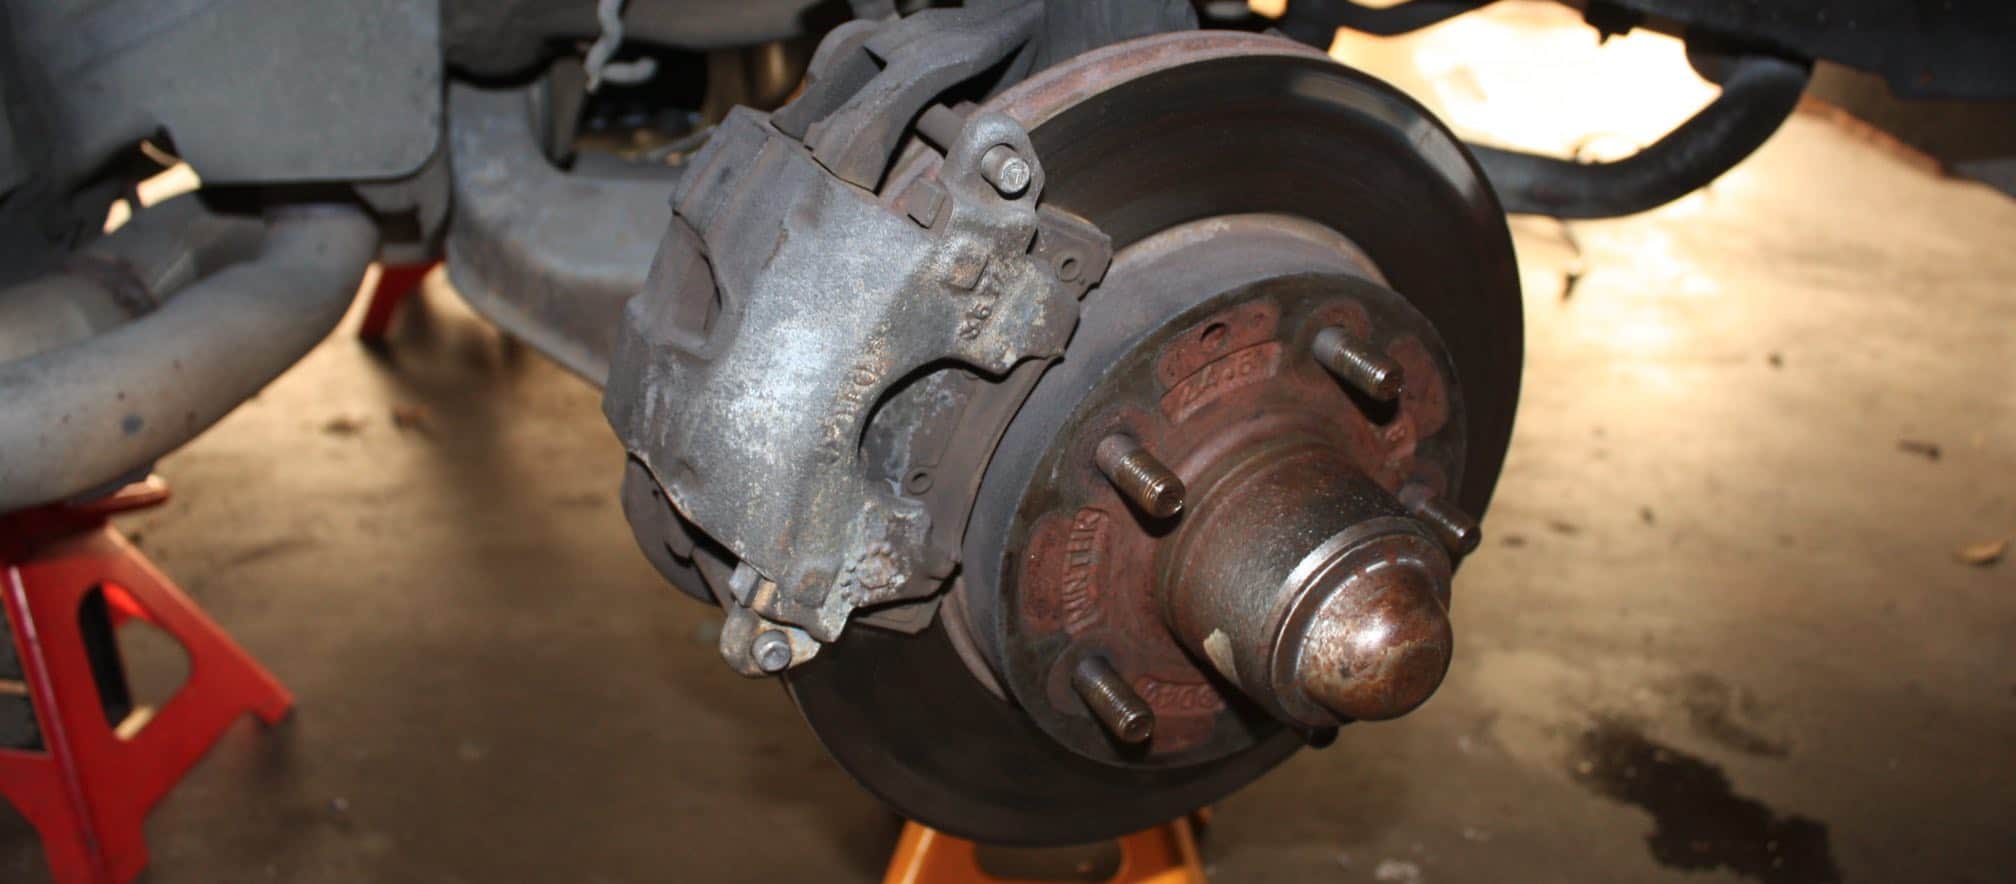
Your brake rotors are the sturdy discs that take all the heat – literally.
They can last between 50,000 and 70,000 miles, depending on how lead-footed you are.
When it’s time for a brake pad replacement, listen for that high-pitched squeal. It’s your car’s way of saying, “Feed me new pads, please!”
The Importance of the Caliper
Now, let’s talk about the brake caliper.
Think of it as the strong-arm of your brake system, squeezing those pads against the rotor like it’s giving it a bear hug.
The caliper works on a push-pull basis. First, it pushes the inner pad out to touch the rotor. Then, it slides back, pulling the outer pad in.
It’s like a brake sandwich, with the rotor as the filling.
Calipers can be floating or fixed. Floating calipers move in and out, while fixed ones stay put. Either way, they’re crucial for even brake pad wear and smooth stopping.
Remember, a sticky caliper can lead to uneven braking. So, if your car starts pulling to one side when you brake, it might be time to give your calipers some TLC.
Preparation for Brake Replacement
Before you dive into changing your brakes, proper preparation is key. Getting your tools and safety gear in order will make the job smoother and keep you out of harm’s way.
Gathering the Right Tools
First things first, let’s round up the gear you’ll need.
A good socket set is your best friend here. Don’t forget a torque wrench – it’s not just for show, folks! You’ll need it to tighten those lug nuts just right.
Grab a jack and jack stands too. Trust me, you don’t want your car coming down for an unexpected visit while you’re working underneath.
Here’s a quick list of must-haves:
- Socket set and ratchet
- Torque wrench
- Jack and jack stands
- Brake cleaner spray
- C-clamp or brake piston tool
- New brake pads (duh!)
Remember, having the right tools is half the battle. The other half? Knowing which end of the wrench to use!
Safety Measures Before You Start
Now, let’s talk safety. Your fingers and toes will thank you later.
First up, park on a flat surface. Trying to change brakes on a hill is like trying to eat soup on a rollercoaster – messy and dangerous.
Always use jack stands when lifting your car. They’re not just fancy car props, they’re your insurance policy against gravity.
Wear safety glasses. Brake dust is no joke, and your eyes aren’t replaceable like brake pads. Gloves are a good idea too, unless you enjoy scrubbing your hands for days.
Lastly, take a deep breath and go slow. Rushing through a brake job is like sprinting through a minefield – exciting, but not recommended.
Step-by-Step Guide to Changing Brake Pads
Ready to tackle those squeaky brakes? Changing your brake pads isn’t rocket science, but it does require some elbow grease and attention to detail. Let’s walk through the process together, shall we?
Removing the Wheel
First things first, you’ll need to get that wheel off.
Jack up your car and secure it on jack stands – safety first, folks! Loosen those lug nuts while the wheel’s still on the ground, then finish removing them once it’s lifted.
Now, give that wheel a good tug. If it’s being stubborn, a gentle tap with a rubber mallet should do the trick. Set it aside and marvel at the brake components you’ve just revealed.
Pro tip: Keep those lug nuts in a safe spot. Nothing’s worse than playing “find the rolling nut” under your car!
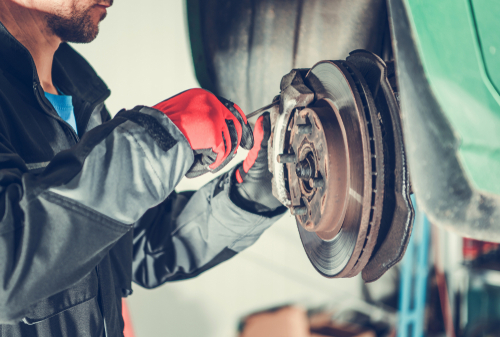
Replacing the Brake Pads
Time to get up close and personal with your brake system.
First, locate the caliper – that big clamp hugging your rotor. You’ll need to remove the slider bolts to pivot this bad boy up.
Once the caliper’s free, you can slide out those old, worn brake pads. They might put up a fight, but a little wiggling should do the trick.
Take a moment to inspect your rotor while you’re in there. Smooth and shiny? Great! Grooved or warped? You might want to consider replacing those too.
Now for the fun part – installing your shiny new brake pads! But before you do, compress that caliper piston.
You can use a special tool or get creative with a C-clamp. Just be gentle, we’re not trying to win any strongman competitions here.
Securing the Caliper and Components
With your new pads in place, it’s time to button everything up.
Lower that caliper back down and reinsert those slider bolts. Give them a good tighten, but don’t go Hulk on them – you want them snug, not stripped.
Check your wear sensors if your vehicle has them. These little tattletales let you know when it’s time for new pads again. Make sure they’re properly connected.
Lastly, give those slide pins a once-over. A little brake grease on these puppies can keep things moving smoothly.
Now, pop that wheel back on, lower your car, and tighten those lug nuts in a star pattern.
Congratulations! You’ve just changed your brake pads. Time to take her for a spin and enjoy that crisp, new brake feel.
The Bedding-in Process

Bedding in your new brakes is crucial for optimal performance and longevity. It’s like teaching your brakes to dance – a little awkward at first, but soon they’ll be moving in perfect harmony.
Understanding Brake Bedding
Ever wonder why your mechanic tells you to take it easy on those shiny new brakes? Well, it’s not because they want to spoil your fun.
Brake bedding is all about creating a smooth, even layer of pad material on your rotors.
You’ll want to find a quiet stretch of road where you can safely speed up and slow down without causing a ruckus.
Think of it as a spa day for your brakes – they need some gentle treatment to reach their full potential.
Start by accelerating to about 35-45 mph, then apply moderate brake pressure.
Don’t come to a full stop, just ease down to about 10 mph. Repeat this process a few times, and you’ll be depositing that crucial layer of pad material on your rotors.
As you feel your brakes improving, you can gradually increase your speed and brake pressure.
It’s like leveling up in a video game, but with less pixels and more stopping power.
The whole process usually takes about 100-300 miles to complete.
Just remember, patience is key. Your brakes will thank you with improved performance and a longer lifespan. Who knew a little TLC could make such a big difference?
When to Seek Professional Help
Knowing when to call in the experts for your brake troubles can save you time, money, and headaches. Let’s explore the signs that indicate it’s time to hand over the wrench and seek professional assistance.
Recognizing Complex Brake Issues
You’re cruising down the highway when suddenly your brake pedal starts pulsating like it’s doing the cha-cha. That’s your cue to visit a pro.
If you hear a grinding noise when braking, it’s like your car is screaming “Help me!” Don’t ignore it.
Other red flags include:
- Brake pedal feeling spongy or going to the floor
- Car pulling to one side when braking
- Dashboard brake warning light staying on
These issues often indicate problems beyond simple pad wear. You might be dealing with warped rotors, failing calipers, or hydraulic system troubles.
Unless you’re secretly a car whisperer, it’s best to leave these to the experts.
Benefits of Expert Brake Services
When you take your ride to a professional mechanic, you’re not just paying for parts and labor. You’re buying peace of mind.
These folks have seen it all and can diagnose issues faster than you can say “antilock braking system.”
A quality brake repair service offers:
- Comprehensive diagnostics
- Access to specialized tools
- Guarantee on parts and labor
- Proper disposal of old brake components
Sure, the brake pad replacement cost might be higher than DIY, but consider the value.
You’re getting expertise that ensures your brakes work perfectly when you need them most. Plus, they’ll likely catch other potential issues before they become wallet-draining nightmares.
Frequently Asked Questions
Brake replacement timing varies based on experience and circumstances. Let’s tackle some common queries about how long this essential maintenance task typically takes.
How long should a seasoned DIYer take to swap out brake pads and rotors?
If you’re handy with a wrench, you might breeze through this job.
A seasoned DIYer can swap out brake pads and rotors in about 2-3 hours.
That’s for all four wheels, assuming everything goes smoothly.
What’s the average wait time for a brake service at your local auto shop?
When you drop your ride off at the shop, don’t expect to be twiddling your thumbs all day.
Most mechanics can knock out a brake pad replacement in 30-60 minutes.
Of course, that’s if they’re not juggling a dozen other oil changes and tune-ups.
Can replacing front brake pads be a quick weekend project, or will it take your entire Saturday?
Good news, weekend warriors! Front brake pads are usually easier to access. You could knock it out in a few hours.